<< Hide Menu
5.2 Photographing Work for Submission
6 min read•june 18, 2024
Sherry Ross
Sherry Ross
How Can I Photograph My Work?
You don't need a fancy camera to photograph your work well. You can use any digital camera or phone that can take a clear photo. It's really easy once you get the hang of it. Plus, taking them with your phone makes it that much easier for you to drop them onto your social media accounts and wait for the ooooohs and ahhhhhs!

Does it Matter if My Work Is 2D, 3D, or Draw?
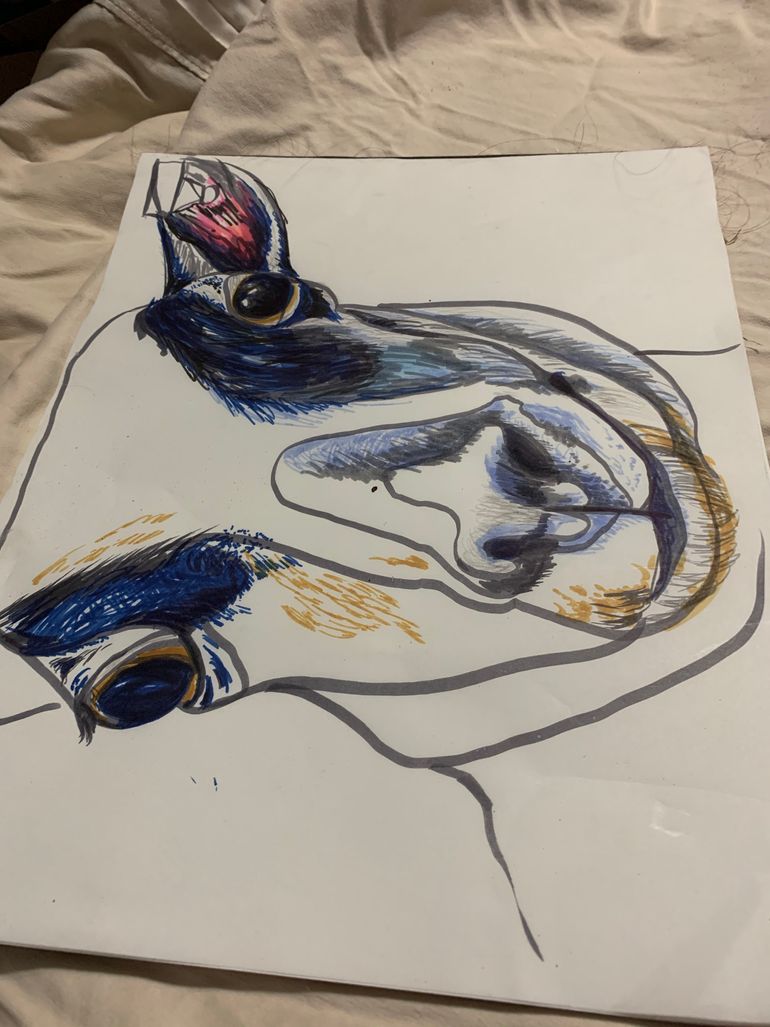
YES! When you are dealing with work that is primarily 2D (flat) you need to photograph it straight on. That sounds kinda strange to say, but most people put their work down and photo it. That leads to a distorted photo. This is what that looks like.

That is NOT what you want! There are two easy ways to get the correct straight on photo that you want.
- You can tape or pin up the piece on the wall in front of you and aim. Make sure you hide the tape on the back or, if you put it in the corners, CROP IT OUT! Do not stand between your work and the light source. Try your flash if you find this hard to do.
- You can place the piece on the floor and lean over it, centering the work in the middle of the viewfinder or screen and take the photo. Be careful - depending on where your light sources are, you can easily cast shadows on your work. Move yourself, the work, or the light source so that you can get a good photo. Take multiple pictures, trying to center it, or even fill your image area with the work. If you can photograph it that way, it means less cropping later. Turn the image to best fit the viewfinder (camera) or screen (phone). You can rotate it later..... but it makes it easier for you to shoot.
Pro Tip: Always view the photos before you move on! Make sure there are no shadows, fingers, or miscellaneous feet shown in them. Checking photos as you take them means you don't have to redo your set up later.
If you are new to photographing artwork, try taking some with and without the flash. You don't want to flash out your color, but you also don't want shadows. Some people like to take their photos outside on an overcast day to reduce shadows.
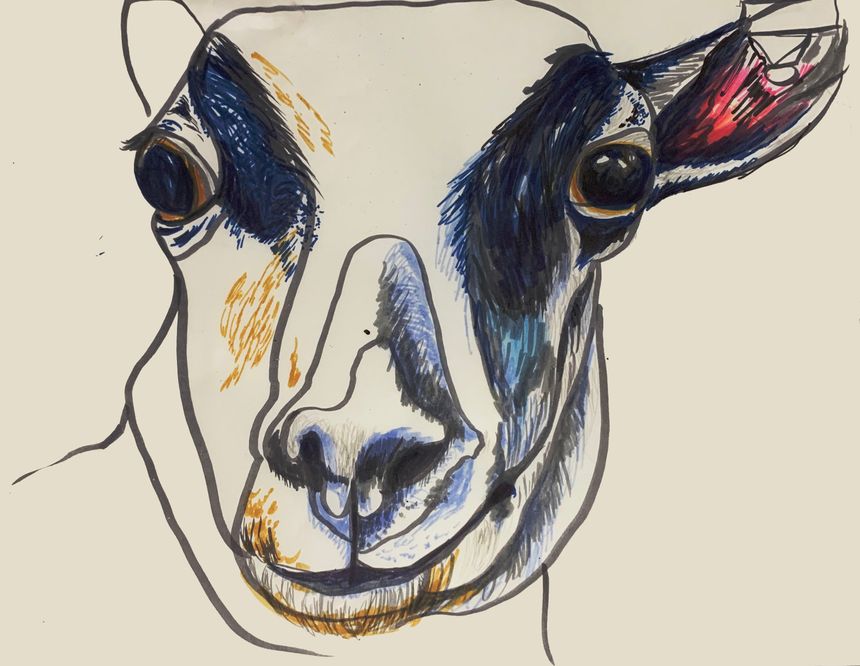
You want your photo to turn out like this (but with finished artwork, not just something random you can reach for an example 😉).

This is a practice piece and, if it was really going to be submitted, the yellow shift on the white paper might need to be color corrected. You can do that on your phone, in whatever app you have, or just retake the shot in a more neutral light. Which brings us to......
Do I need fancy lights and stuff?
No. Lots of people shoot outside. That can get hot, so if you prefer, do it indoors. For 2D, follow the above guidelines about lighting—inside or outside. For 3D, things get more complicated. When you are shooting 3D work you need to consider the following:
-
- Background—You want a neutral background that "fades" out of the viewer's awareness. It should be ALL ABOUT THE ART, not what it's sitting on or in front of. If the piece is small, try using a large piece of paper, taping it behind the work, and bending it forward so that the artwork has a seamless background. If the work is larger, try using a solid color sheet, again making sure it extends under the piece and in front of it. White works well for almost anything. If the piece is white, consider using another solid color.
-
- Shadows—When you are dealing with documenting (photographing) 3D work, you need to think about how it interacts with the space AROUND it. Are there interior empty spaces? Are there extensions you need to consider? The shadows created not only inform the viewer about the work, but they also contribute to the work by depicting the space it inhabits. Try moving your lighting source around the piece while photographing. Sometimes, it's easier to have someone else hold the light while you photograph.
-
- Form—Since this is a form (meaning it occupies 3D space) rather than a shape (confined to 2D or flat space), your photographs need to document the form of the work. Move around the work, changing perspectives, and viewpoints to capture all angles. You might want to move the lighting as you do this.
-
- Lighting—For your lighting, you have several options. While regular room lighting might show the work, it won't give you strong shadows. You can try shooting outside and let strong sunlight do it for you, but you have to watch for your own shadow. For controllable directional lighting, you can use the flash on your camera or phone, a flashlight, or any small movable lighting source. A small desk lamp is usually really good for this, especially if you can remove the shade. As you light the work, move the light into different positions - high, low, left, right - and look to see what creates the most interesting lighting on your work and the best shadows.
Pro Tip: 3D work is ALL ABOUT SHOWING FORM AND SHADOW!
-
- Multiple views—As you photograph, make sure to MOVE AROUND THE WORK, changing perspective and viewpoint. For 3D work, you will need at least two photos of each work showing significantly different views to help the readers understand how the work interacts in the space. It's perfectly acceptable to move the work to keep the background neutral, especially if you are working in a tight space. 👍🏽 If you have several great shots of one piece, you can always use a composite (multiple photos in one) image.
What About Editing the Photos?
For documenting your artwork, you want the photo to look as NATURAL as possible. Things like cropping, straightening, color correcting, and increasing contrast are all ok. You don't want your photos to look overly "done". Things like filters, color changes, over saturating, and overly HRD'ing it all will distract from the work and shift the focus to the effect, not the work.
When you are preparing your photos for submission, save your work as a JPG. Make sure it is saved in the correct orientation (vertical or horizontal). Save your images as close to 5 MBs as possible. The website says 3 MBs and gives a specific size.... it will take up to 5 MBs. You don't want your images too small to be viewed! 🔍
Name your files so that you will know they are the ones edited and prepared for AP. This will make it easier to find the correct ones. You can use the name of the piece or something as simple as SI1, SI2, etc. The image name isn't shown so don't worry if it "doesn't match" the location you put it in. 😉
Can I Use a Filter on it?
Simple answer? NO. Keep your photos as close to raw as possible. See the above post.
What size does it need to be?
All submissions must be under 5 MBs to be able to be uploaded. Keep the size as close to that as possible.
How should I name it?
Name it something that will designate to you what it is. Use the name of the piece or something like SI1, SI2, etc. This will make it easy to find and it will let you know you have already edited and sized it for upload. 👍🏽

© 2024 Fiveable Inc. All rights reserved.